

How To Create Contact Sheet In Photoshop Cs4
Back when Adobe's Creative Suite 4 was launched, many people bemoaned the fact that an old favorite plug-in, Picture Package (Contact Sheet II) and its associated Web Gallery counterpart, had been retired. Well, not completely gone, because even in the latest version of CS5 you can still get the old plugins from Adobe, as explained in this post from John Nack.
However, while these plug-ins are euphemistically called "optional," the smart thinkers will be reading between the lines and considering them "on their way out." What's a hard working creative supposed to do for contact sheets? The functions have been moved and enhanced, but you have to know where to look. And, "where to look" is in the Output workspace of Bridge CS5 (CS4 works similarly, if you're still using that version).
In this tip, we'll look at the Contact Sheet feature. If you want to see the best way to produce a flexible Picture Package, look to my previous tip on the subject.
In Bridge, select the images you want to want to include in your contact sheet. Then, at the top of the Bridge window, select "Output" to change to the Output Workspace.

Once in the Output Workspace, note several changes that have occurred:
- The "Content" panel has moved to the bottom and has become a filmstrip.
- The "Preview" panel is now front and center, containing all the images you have currently selected.
- The "Output" panel now occupies the entire right side panel

With this, we have what we need to create a contact sheet. Let's start at the top of the Output panel, and work our way down. At the top, we see this:
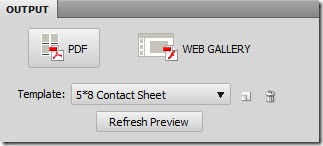
With this panel, we select whether we are going to direct our output to a PDF (for printing, email, etc) or to a web gallery. For now, we will pick "PDF" and then click the dropdown list to choose the template. We'll pick "5*8 Contact Sheet," but notice the other options available (and note that you can save your own as well):

Now that we've selected the 5×8 contact sheet, let's go ahead and click the "Refresh Preview" button, which will give us our first output preview:

Once you click "Refresh Preview," a NEW panel opens, called the "Output Preview" panel. Note that the original Preview panel is still there, but now there are two tabbed panels. Within the Output Preview panel, is a rendering of our PDF contact sheet, first try:

Clicking on the Output Preview zooms in, Alt/Option clicking zooms out. Looking at the right side panel, we have an accordion panel with all sorts of options for customization of this PDF. The options in a quick summary are:
- Document: Set your paper size, background color, and image quality. You can also set a password for security in opening the PDF.
- Layout: The parameters are set for our 5 x 8 thumbnails, but you can customize the number of rows and columns, margins and gutters, and set whether to auto rotate for best fit.
- Overlays: For our 5 x 8 preset, the overlays are configured to display the file name and file extension. You can control the text font and color, and you can add page numbering as well.
- Header and Footer: allow you to add text per page, with options for text font, size and color.
- Playback: In the section, you can choose to create a PDF that will open in full screen, and can play as a slideshow (not particularly useful for contact sheets).
- Watermark: You can add a text or graphical watermark to appear on each image.
As you make changes, you can click the "Refresh Preview" button to see the results. Once you've set the options to taste, you can save the preset (as we mentioned above) by clicking the icon next to the preset name:

After you've created the settings you desire, simply click "Save…" at the bottom of the panel and you'll be prompted to name your file and choose the location to save it. You can also check the box at the bottom to "View PDF After Save." Once you've saved out the PDF, you can distribute it as desired:

The Bridge Output workspace is where all the heavy output lifting gets done in Creative Suite 4 and 5. Get to know this panel, as you can bet that Adobe will continue to add new features and functions here in the future. Next time here on TipSquirrel, we'll look at creating a Web Contact Sheet, and after that, you'll never fret over the old "optional" plug-ins again.
- Bridge
- Contact Sheet
- Output
- Photoshop

Mike has been a photographer, artist, educator, and technophile for most of his life. Early in his career, he created technical illustrations and photographs for electronic equipment manufacturers, and taught classes in computer aided drafting and 3D modeling software. When digital cameras became widely available in the late 1990s, the move was a natural one, and has led to a happy combination of technology, software, photography and art. Mike is an Adobe Certified Expert in Photoshop and Acrobat, and is well versed in Lightroom and Photoshop Elements, as well as Illustrator and InDesign. He has also contributed his time and efforts to the excellent work being done by Operation Photo Rescue, in restoring photographs damaged by natural disasters. As an active member of the National Association of Photoshop Professionals, he continues his quest for excellence in art, excellence in design, and excellence in education.
60 Comments on Contact Sheets in Photoshop CS5
How To Create Contact Sheet In Photoshop Cs4
Source: https://www.tipsquirrel.com/contact-sheets-in-photoshop-cs5/
Posted by: proctorgoicerouth.blogspot.com
0 Response to "How To Create Contact Sheet In Photoshop Cs4"
Post a Comment